
The COCO Dataset
COCO annotations are inspired by the Common Objects in Context (COCO) dataset. According to cocodataset.org/#home:
"COCO is a large-scale object detection, segmentation, and captioning dataset. COCO has several features: Object segmentation, Recognition in context, Superpixel stuff segmentation, 330K images (>200K labeled), 1.5 million object instances, 80 object categories, 91 stuff categories, 5 captions per image, 250,000 people with keypoints."
It is one of the best image datasets available, so it is widely used in cutting edge image recognition artificial intelligence research. It is used in open source projects such as Facebook Research's Detectron, Matterport's Mask R-CNN, endernewton's Tensorflow Faster RCNN for Object Detection, and others.
COCO Data Format
According to cocodataset.org/#format-data:
COCO has five annotation types: for object detection, keypoint detection, stuff segmentation, panoptic segmentation, and image captioning. The annotations are stored using JSON.
I highly recommend you read that page to understand how it works. Even reading that page, it wasn't fully clear to me how to do it, so I've created some example code and JSON to help.
Object Detection
I'm going to use the following two images for an example. The COCO dataset only contains 80 categories, and surprisingly "lamp" is not one of them. I'm going to create this COCO-like dataset with 4 categories: houseplant, book, bottle, and lamp. (The first 3 are in COCO)


The first step is to create masks for each item of interest in the scene. That's 5 objects between the 2 images here. In the method I'm teaching here, it doesn't matter what color you use, as long as there is a distinct color for each object. You also don't need to be consistent with what colors you use, but you will need to make a note of what colors you used for each category.
Important note #1: Even if there were 2 books in one scene, they would need different colors, because overlapping books would be impossible to distinguish by the code we are going to write.
Important note #2: Make sure each pixel is a solid color. Some image applications will perform smoothing around the edges, so you'll get blended colors and this method won't work. Note the rough edges below.

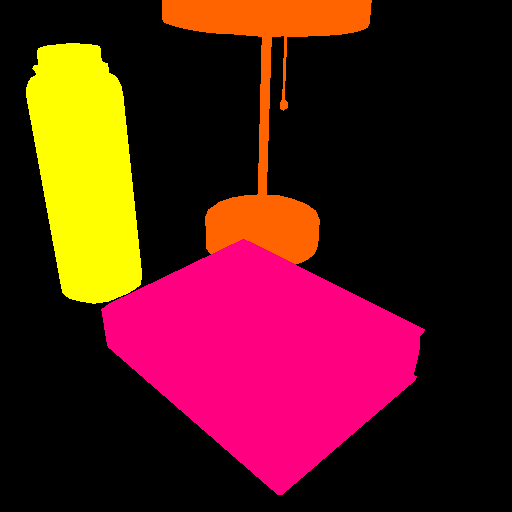
Image 1 colors: (0, 255, 0): houseplant; (0, 0, 255): book
Image 2 colors: (255, 255, 0): bottle; (255, 0, 128): book; (255, 100, 0): lamp
I've also assigned the following categories (you can choose any integers you want): 1 = houseplant, 2 = book, 3 = bottle, 4 = lamp
High Level Overview of Creating Annotations
This is the only difficult part, really. Here are the steps required for this method:
1. Write code to automatically split up the image into individual masks
2. Write code to create polygons out of each individual mask
3. Convert the information to JSON
Create sub-masks
Here's a python function that will take in a mask Image object and return a dictionary of sub-masks, keyed by RGB color. Note that it adds a padding pixel which we'll account for later.
from PIL import Image # (pip install Pillow)

def create_sub_masks(mask_image):
    width, height = mask_image.size

    # Initialize a dictionary of sub-masks indexed by RGB colors
    sub_masks = {}
    for x in range(width):
        for y in range(height):
            # Get the RGB values of the pixel
            pixel = mask_image.getpixel((x,y))[:3]

            # If the pixel is not black...
            if pixel != (0, 0, 0):
                # Check to see if we've created a sub-mask...
                pixel_str = str(pixel)
                sub_mask = sub_masks.get(pixel_str)
                if sub_mask is None:
                   # Create a sub-mask (one bit per pixel) and add to the dictionary
                    # Note: we add 1 pixel of padding in each direction
                    # because the contours module doesn't handle cases
                    # where pixels bleed to the edge of the image
                    sub_masks[pixel_str] = Image.new('1', (width+2, height+2))

                # Set the pixel value to 1 (default is 0), accounting for padding
                sub_masks[pixel_str].putpixel((x+1, y+1), 1)

    return sub_masks
Create sub-mask annotation
Here's a python function that will take a sub-mask, create polygons out of the shapes inside, and then return an annotation dictionary. This is where we remove the padding mentioned above.
import numpy as np                                 # (pip install numpy)
from skimage import measure                        # (pip install scikit-image)
from shapely.geometry import Polygon, MultiPolygon # (pip install Shapely)

def create_sub_mask_annotation(sub_mask, image_id, category_id, annotation_id, is_crowd):
    # Find contours (boundary lines) around each sub-mask
    # Note: there could be multiple contours if the object
    # is partially occluded. (E.g. an elephant behind a tree)
    contours = measure.find_contours(sub_mask, 0.5, positive_orientation='low')

    segmentations = []
    polygons = []
    for contour in contours:
        # Flip from (row, col) representation to (x, y)
        # and subtract the padding pixel
        for i in range(len(contour)):
            row, col = contour[i]
            contour[i] = (col - 1, row - 1)

        # Make a polygon and simplify it
        poly = Polygon(contour)
        poly = poly.simplify(1.0, preserve_topology=False)
        polygons.append(poly)
        segmentation = np.array(poly.exterior.coords).ravel().tolist()
        segmentations.append(segmentation)

    # Combine the polygons to calculate the bounding box and area
    multi_poly = MultiPolygon(polygons)
    x, y, max_x, max_y = multi_poly.bounds
    width = max_x - x
    height = max_y - y
    bbox = (x, y, width, height)
    area = multi_poly.area

    annotation = {
        'segmentation': segmentations,
        'iscrowd': is_crowd,
        'image_id': image_id,
        'category_id': category_id,
        'id': annotation_id,
        'bbox': bbox,
        'area': area
    }

    return annotation
Putting it all together
Finally, we'll use these two functions on our images
import json

plant_book_mask_image = Image.open('/path/to/images/plant_book_mask.png')
bottle_book_mask_image = Image.open('/path/to/images/bottle_book_mask.png')

mask_images = [plant_book_mask_image, bottle_book_mask_image]

# Define which colors match which categories in the images
houseplant_id, book_id, bottle_id, lamp_id = [1, 2, 3, 4]
category_ids = {
    1: {
        '(0, 255, 0)': houseplant_id,
        '(0, 0, 255)': book_id,
    },
    2: {
        '(255, 255, 0)': bottle_id,
        '(255, 0, 128)': book_id,
        '(255, 100, 0)': lamp_id,
    }
}

is_crowd = 0

# These ids will be automatically increased as we go
annotation_id = 1
image_id = 1

# Create the annotations
annotations = []
for mask_image in mask_images:
    sub_masks = create_sub_masks(mask_image)
    for color, sub_mask in sub_masks.items():
        category_id = category_ids[image_id][color]
        annotation = create_sub_mask_annotation(sub_mask, image_id, category_id, annotation_id, is_crowd)
        annotations.append(annotation)
        annotation_id += 1
    image_id += 1

print(json.dumps(annotations))
Output JSON
And here's our output! (I omitted a lot of the vertices for readability)
[{
    "segmentation": [[228.0, 332.5, 248.0, 325.5, ..., 228.0, 332.5]],
    "iscrowd": 0,
    "image_id": 1,
    "category_id": 1,
    "id": 1,
    "bbox": [95.5, -0.5, 201.0, 333.0],
    "area": 33317.25
},
{
    "segmentation": [[340.0, 483.5, 343.5, 481.0, ..., 340.0, 483.5]],
    "iscrowd": 0,
    "image_id": 1,
    "category_id": 2,
    "id": 2,
    "bbox": [209.5, 244.5, 225.0, 239.0],
    "area": 28645.25
},
{
    "segmentation": [[95.0, 303.5, 108.0, 301.5, ..., 95.0, 303.5]],
    "iscrowd": 0,
    "image_id": 2,
    "category_id": 3,
    "id": 3,
    "bbox": [25.5, 42.5, 116.0, 261.0],
    "area": 22243.5
},
{
    "segmentation": [[282.0, 494.5, 415.5, 379.0, ..., 282.0, 494.5]],
    "iscrowd": 0,
    "image_id": 2,
    "category_id": 2,
    "id": 4,
    "bbox": [100.5, 238.5, 324.0, 256.0],
    "area": 47241.0
},
{
    "segmentation": [[298.0, 263.5, 311.0, 256.5, ..., 298.0, 263.5]],
    "iscrowd": 0,
    "image_id": 2,
    "category_id": 4,
    "id": 5,
    "bbox": [161.5, -0.5, 210.0, 264.0],
    "area": 14593.25
}]
To be continued...