Reinforcement Learning Penguins (Part 3/4) | Unity ML-Agents
Scene Construction
In this tutorial, you will create a Scene that includes a penguin, a baby penguin, several fish, and a small, enclosed area where the penguin can move around, collect fish, and feed the baby. You will use the C# scripts written in the previous tutorial to enable ML-Agents to learn and make intelligent decisions.
Create the baby penguin Prefab
In this section, you’ll create a Prefab for the baby penguin.
- Double-click on the BabyPenguin Prefab in the Prefabs folder to open it.
- Add a Rigidbody component.
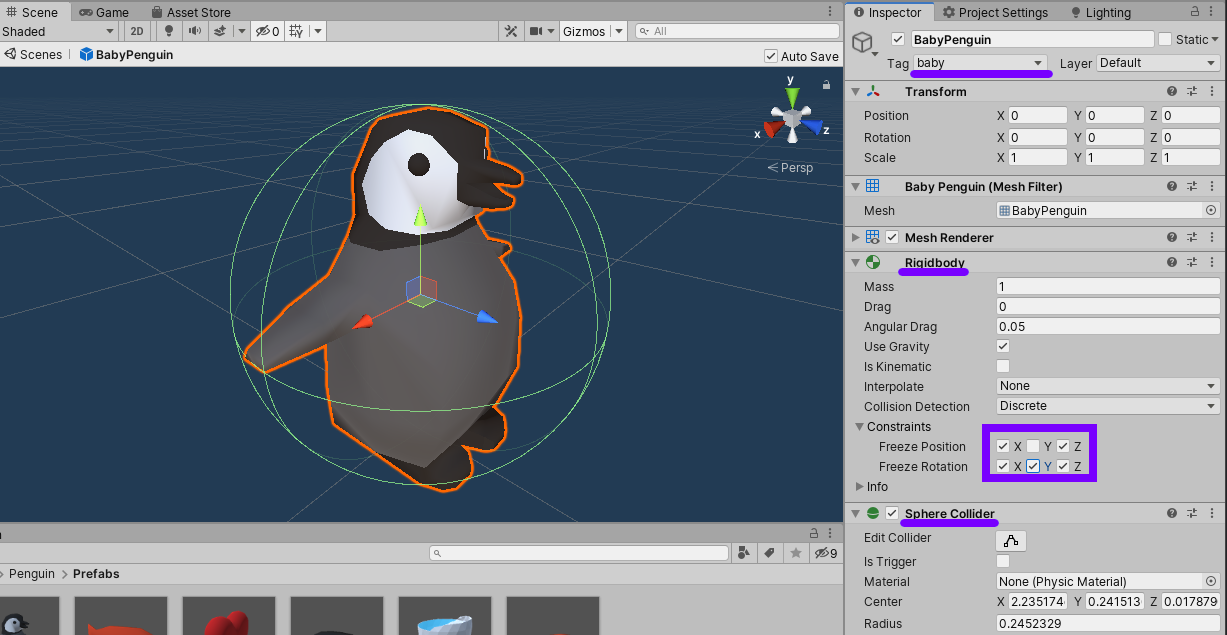
- Set the Rigidbody Constraints to lock position in X and Z and to lock rotation in X, Y, and Z so that the baby doesn't accidentally get knocked around, but can still be affected by gravity
- Add a Sphere Collider.
- Set the Sphere Collider Center to (0, 0.24, 0).
- Set the Sphere Collider Radius to 0.25.
- Change the tag to "baby" (you will need to create a new tag first).
Figure 01: The BabyPenguin, with all changes in the Inspector highlighted
Create the fish Prefab
In this section, you’ll create a Prefab for the fish that the penguin agent needs to catch.
- Double-click on the Fish Prefab in the Prefabs folder to open it.
- Add a Rigidbody component.
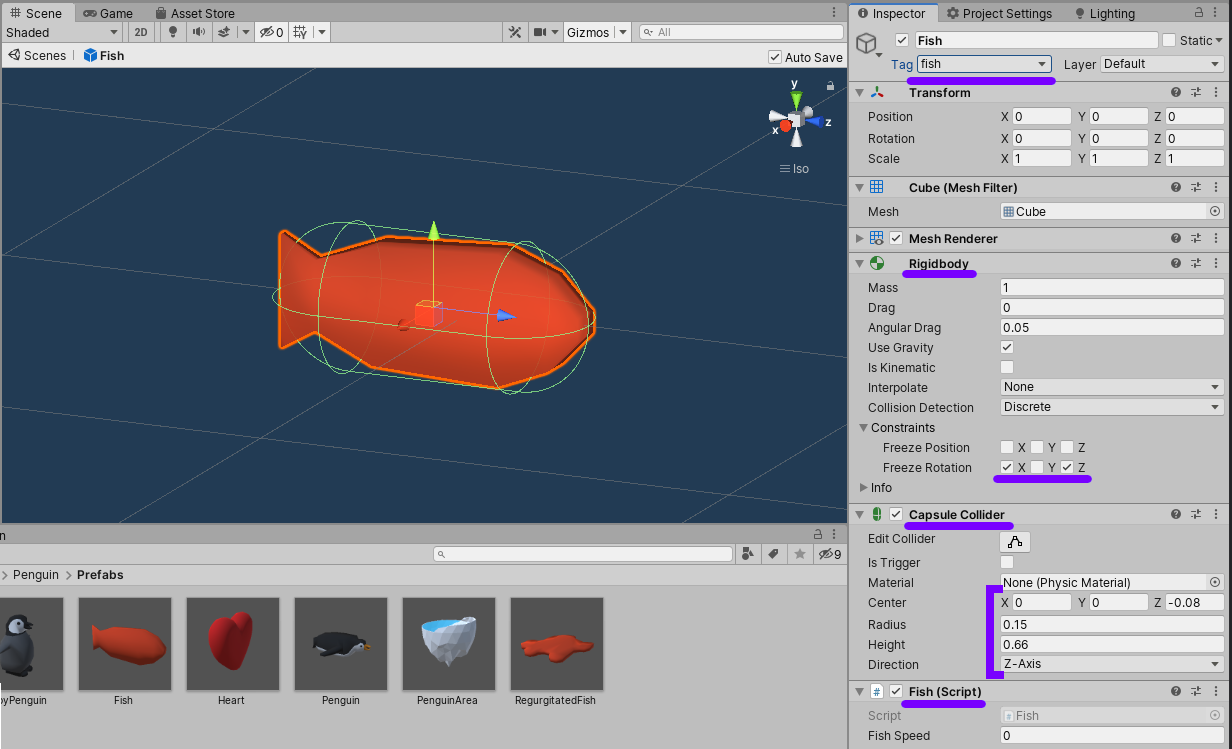
- Set the Rigidbody Constraints to lock rotation in X and Z so that it doesn't flip over
- Add a Capsule Collider that encapsulates the fish.
- Set the Capsule Collider Center to (0, 0, -0.08).
- Set the Capsule Collider Radius to 0.15.
- Set the Capsule Collider Height to 0.66.
- Set the Capsule Collider Direction to Z-axis.
- Change the tag to "fish" (you will need to create a new tag first).
- Attach the Fish script.
Figure 02: The fish, with all changes in the Inspector highlighted
Create the penguin agent
In this section, you’ll create a penguin agent that can observe its environment and take actions using deep learning. We won’t train it yet. We’re just setting it up for now.
- Double-click on the Penguin Prefab in the Prefabs folder to open it.
- Add a Rigidbody component.
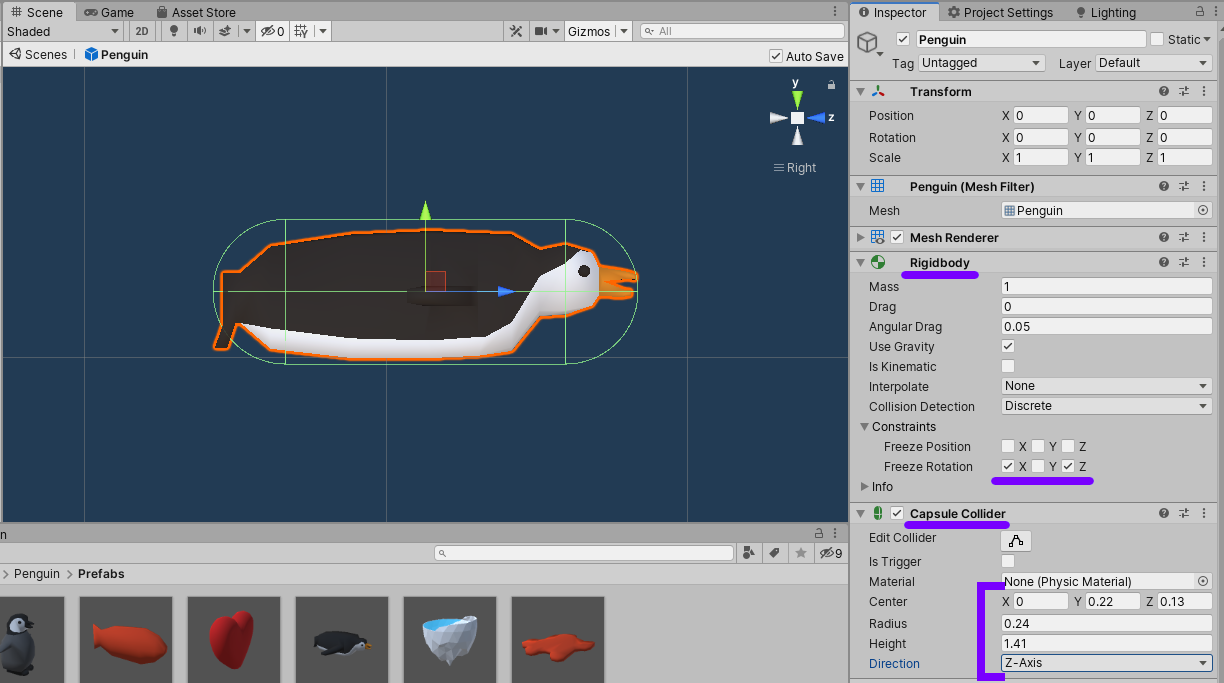
- Set the Rigidbody Constraints to lock rotation in X and Z so that it doesn't flip over.
- Add a Capsule Collider.
- Set the Capsule Collider Center to (0, 0.22, 0.13).
- Set the Capsule Collider Radius to 0.24.
- Set the Capsule Collider Height to 1.41.
- Set the Capsule Collider Direction to Z-axis.
Figure 03: The Penguin, with changes for Rigidbody and Capsule Collider in the Inspector highlighted
- Attach the PenguinAgent script.
- If the BehaviorParameters script is not added automatically, add that as well.
- Set up Behavior Parameters (Figure 04):
- Behavior Name: Penguin
- Space Size: 8
- Branches Size: 2
- Branch 0 Size: 2
- Branch 1 Size: 3
- Set up Penguin Agent (Figure 04):
- Max Step: 5000
- Decision Interval: 4
- Drag the Heart Prefab from the Project tab into the appropriate box.
- Drag the Regurgitated Fish Prefab from the Project tab into the appropriate box.
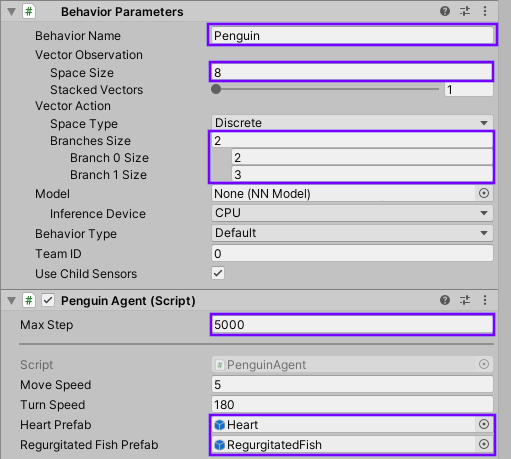
Figure 04: Inspector changes for the Behavior Parameters and PenguinAgent components on the Penguin prefab
The Behavior Name will need to match configuration files that you will make in the Training and Inference tutorial. Make sure that it’s spelled exactly the same or else training will not work.
The Vector Observation Space Size corresponds to the sensor.AddObservation() calls we made in CollectObservations() in PenguinAgent.cs. We have eight total values.
The Vector Action Branches Size indicates how many actions are possible. In our case, these are Move Forward and Turn, so we have two. Branch 0 is Move Forward, and we have two options: don't move and move forward. Branch 1 is Turn, and we have three options: turn left, don't turn, and turn right.
Max Steps means the agent will reset automatically after 5,000 steps. Decision Interval of 4 means that the agent will be asked what to do every four steps and will carry out that action between each request.
- Add a RayPerceptionSensorComponent3D component.
- Set up the RayPerceptionSensorComponent3D (Figure 05):
- Detectable tags size: 3
- Element 0: baby
- Element 1: fish
- Element 2: Untagged
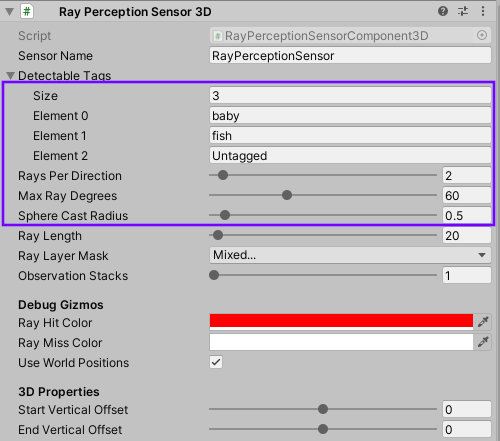
Figure 05: Inspector changes for the RayPerceptionSensorComponent3D on the Penguin
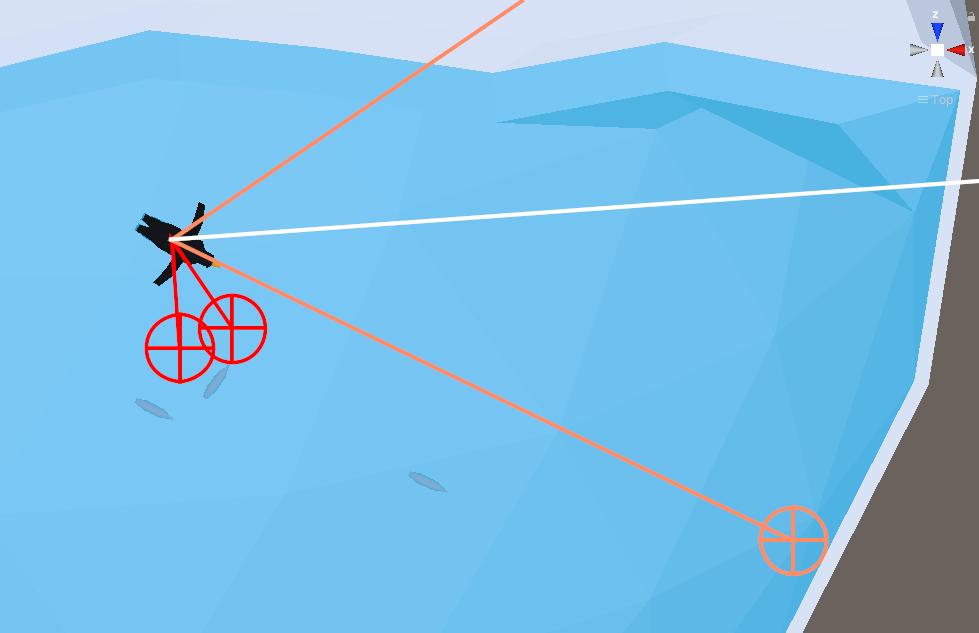
Detectable Tags tells the sensor which tags to report collisions for. Rays Per Direction tells the sensor to cast two rays to either side of center, as well as straight ahead. Max Ray Degrees tells the sensor to spread the two rays out 60 degrees in either direction. The total spread is 120 degrees, 30 degrees between each ray. Sphere Cast Radius projects a sphere of radius 0.5 along each ray to test collisions, not just a single point in space.
The screenshot below (Figure 06) shows spherecasts, two of which have hit fish and two of which have hit the walls of the environment. The white line seems to have somehow passed through the wall. This is a reminder that Unity Physics is not flawless, but fortunately our ML-Agents are robust enough to work despite occasional misleading or incomplete information.
Figure 06: Penguin spherecasts as seen in the Scene view while the game is playing
- Add a DecisionRequester component.
 Figure 07: The DecisionRequester component attached to the agent
This component causes the agent to make a decision automatically, every 5 steps by default. If you forget this component, your agent will never make any decisions or take any actions. In other words, it won't work at all.
Penguin area
In this section, you’ll create an enclosed space for the penguin agent to catch fish and feed its baby. ML-Agents can work in environments of any shape and size, but this tutorial uses a small, confined space to keep things simple.
- Double-click on the PenguinArea Prefab in the Prefabs folder to open it.
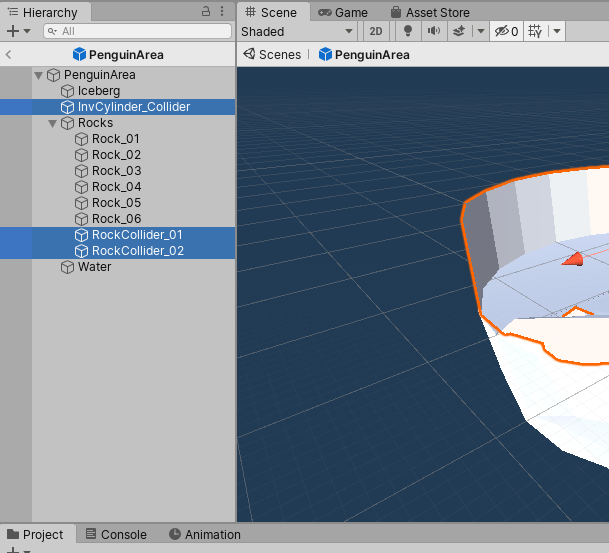
- Hold the Ctrl key on your keyboard and click on InvCylinder_Collider, RockCollider_01 and RockCollider_02 to select all three (Figure 07). These 3d Meshes are intended to be simplified Mesh Colliders and will not be visible.
Figure 08: The three colliders selected
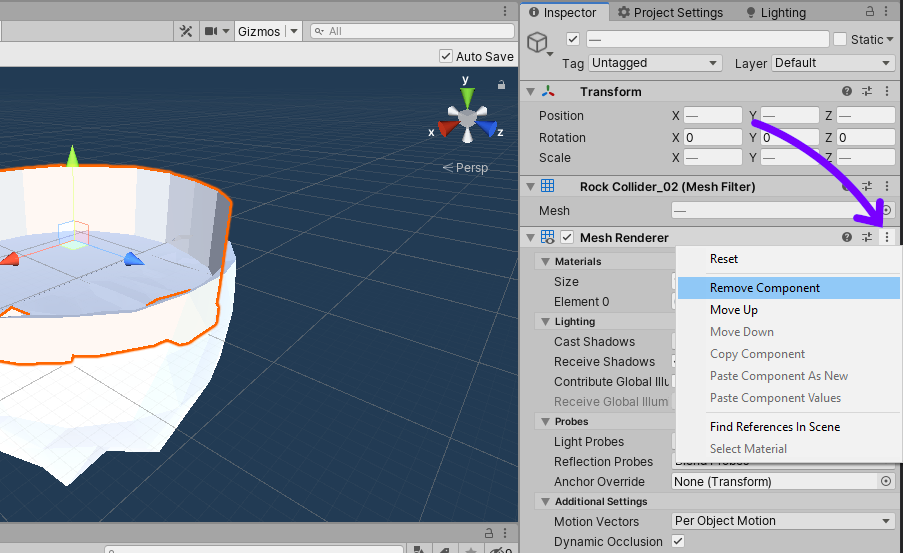
- Remove the Mesh Renderer component using the drop-down menu in the Inspector as shown (Figure 09). This will make the Colliders invisible to the camera.
Figure 09: Removing the Mesh Renderer from the Collider objects
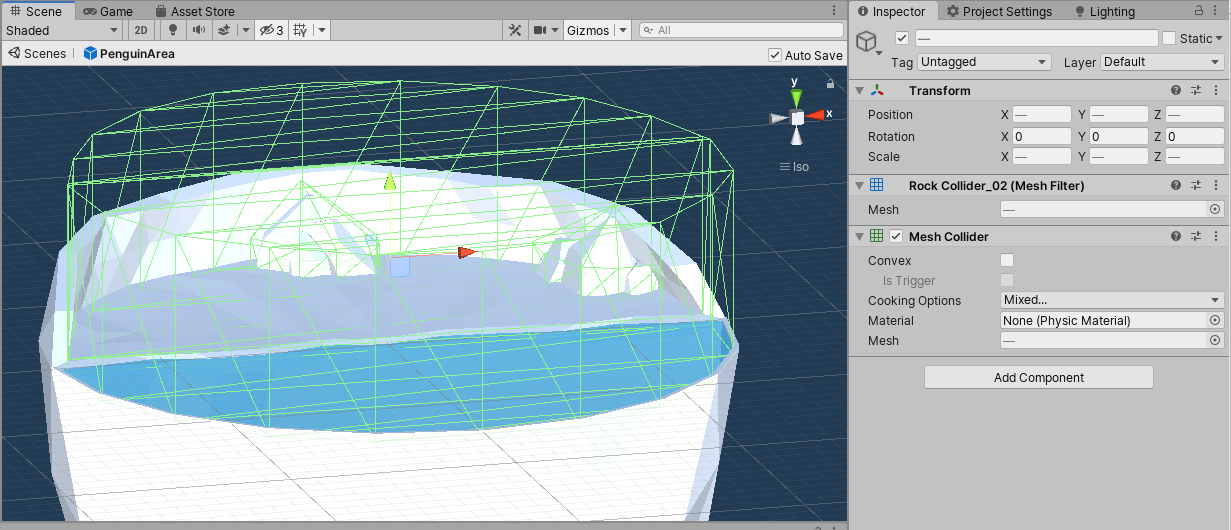
- Click the Add Component button and add a Mesh Collider component to all three objects (Figure 10).
Figure 10: Newly added Mesh Colliders on the three collider objects
- Create a new folder called Materials inside Assets\Penguin.
- Create a new Material called Snow in the Materials folder.
- Set the Snow Albedo/Color to 255, 255, 255, 255.
- Set the Snow Smoothness to 0.
- Create a new Material called Water in the Materials folder.
- Set the Water Rendering Mode to Transparent.
- Set the Water Albedo/Color to 0, 200, 255, 165.
- Set the Water Smoothness to 0.
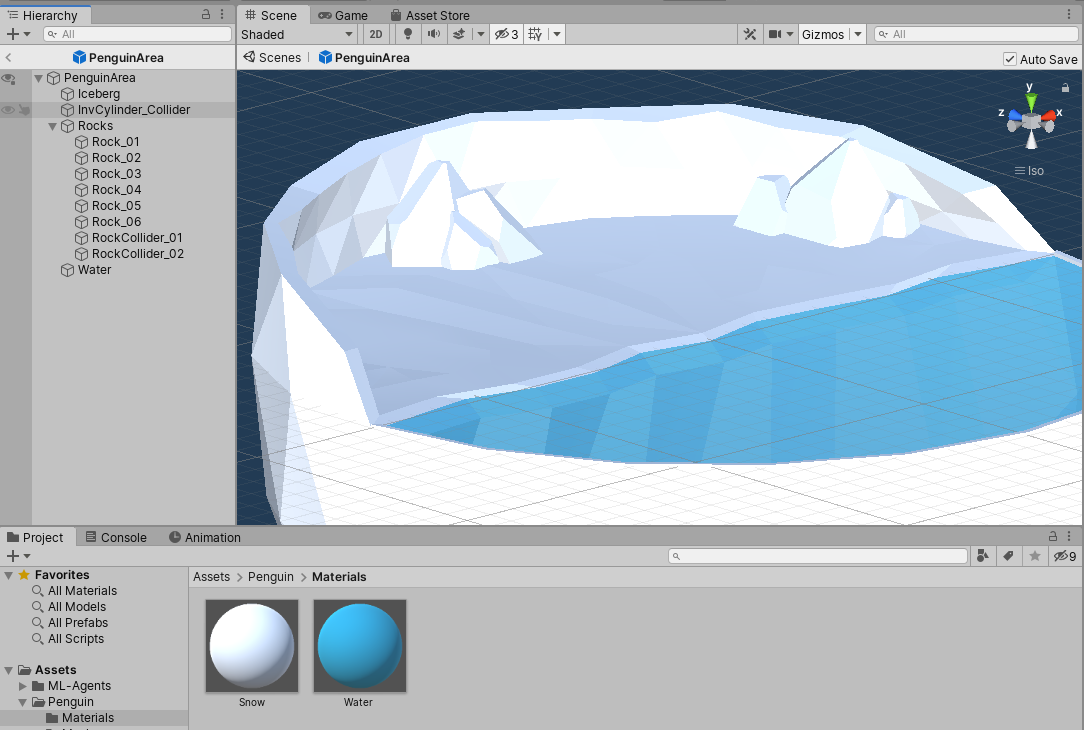
- Apply the Snow Material to the iceberg and rocks in the area. (You can apply Materials to multiple objects at once by Ctrl + clicking each object and dragging the Material into the Inspector tab).
- Apply the Water Material to the water.
Figure 11: The PenguinArea with Snow and Water Materials applied
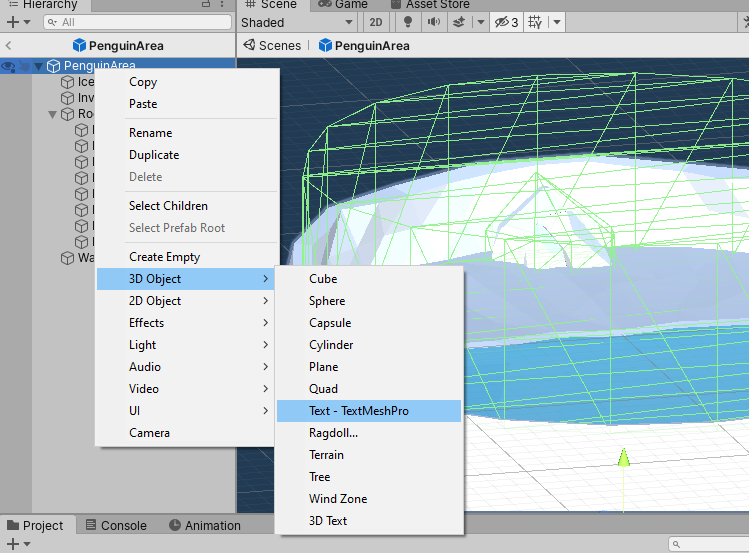
- Create a new Text Mesh Pro object by right-clicking on PenguinArea, and choosing 3D Object > Text - TextMeshPro (Figure 12).
Figure 12: Adding a Text - TextMeshPro
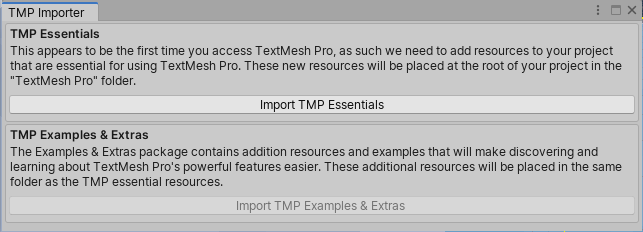
- Click the Import TMP Essentials button if prompted.
Figure 13: The TMP Importer window
You should now have a 2D text object floating in 3D space.
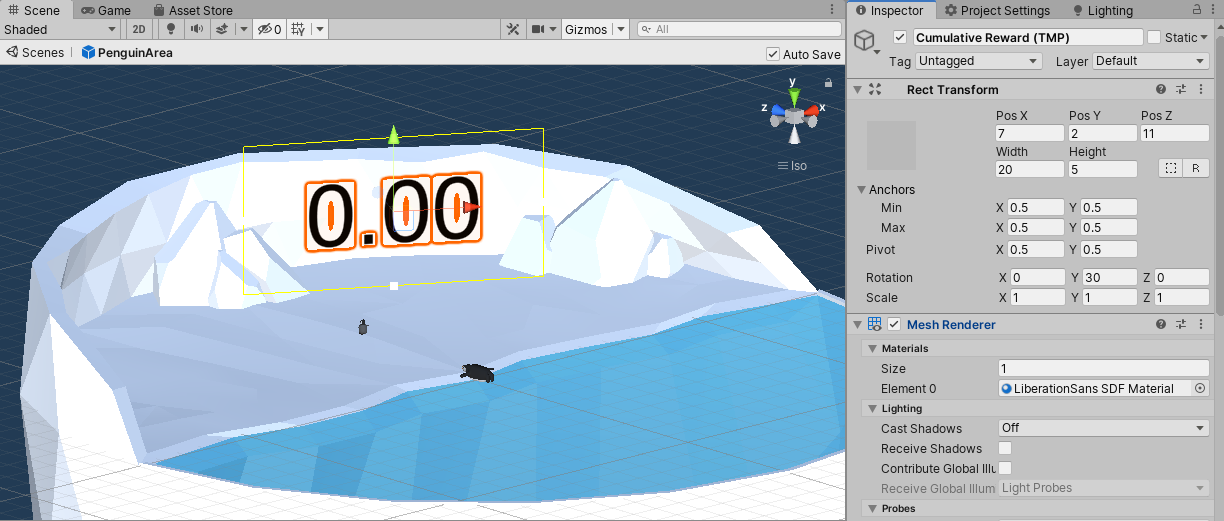
- Rename the object to Cumulative Reward (TMP).
- Move the text so that you can see it:
- PosX: 7
- PosY: 2
- PosZ: 11
- Width: 20
- Height: 5
- Rotation (0, 30, 0)
Figure 14: The Cumulative Reward text placed in the PenguinArea
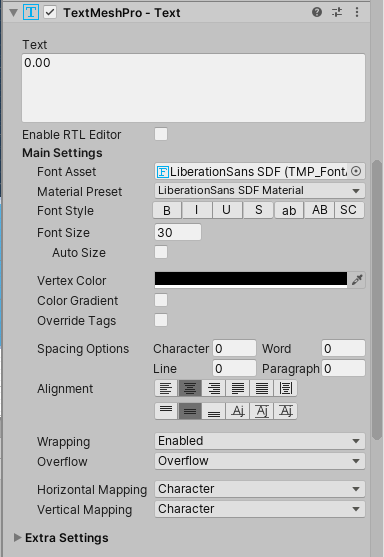
- Set the Text settings:
- Default text: 0.00
- Font Size: 30
- Vertex Color: Black
- Alignment: Center Horizontal and Center Vertical
Figure 15: TextMeshPro settings in the Inspector
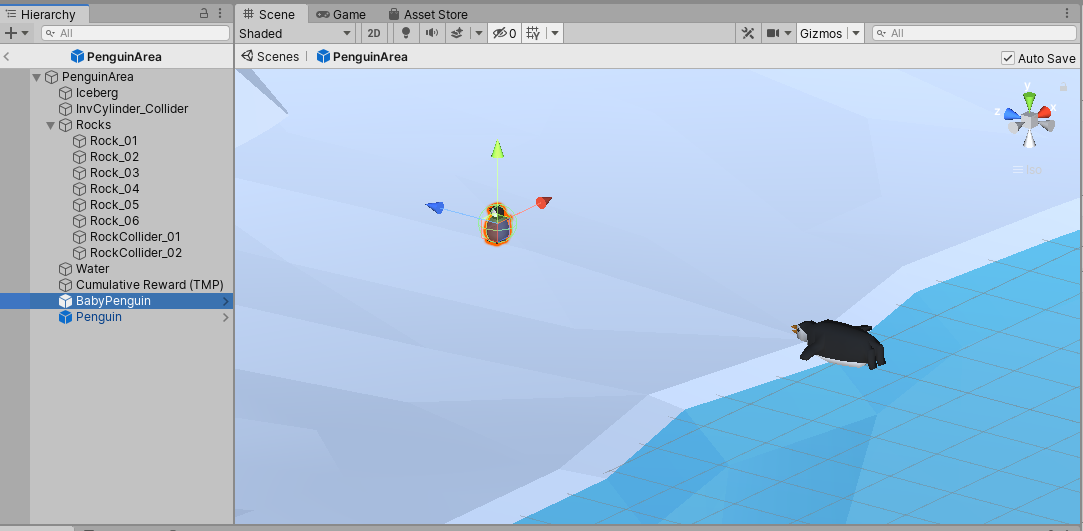
- Add a BabyPenguin Prefab to the area.
- Add a Penguin (agent) Prefab to the area.
Figure 16: The PenguinArea (in the Prefab editor) with BabyPenguin and Penguin Prefabs added
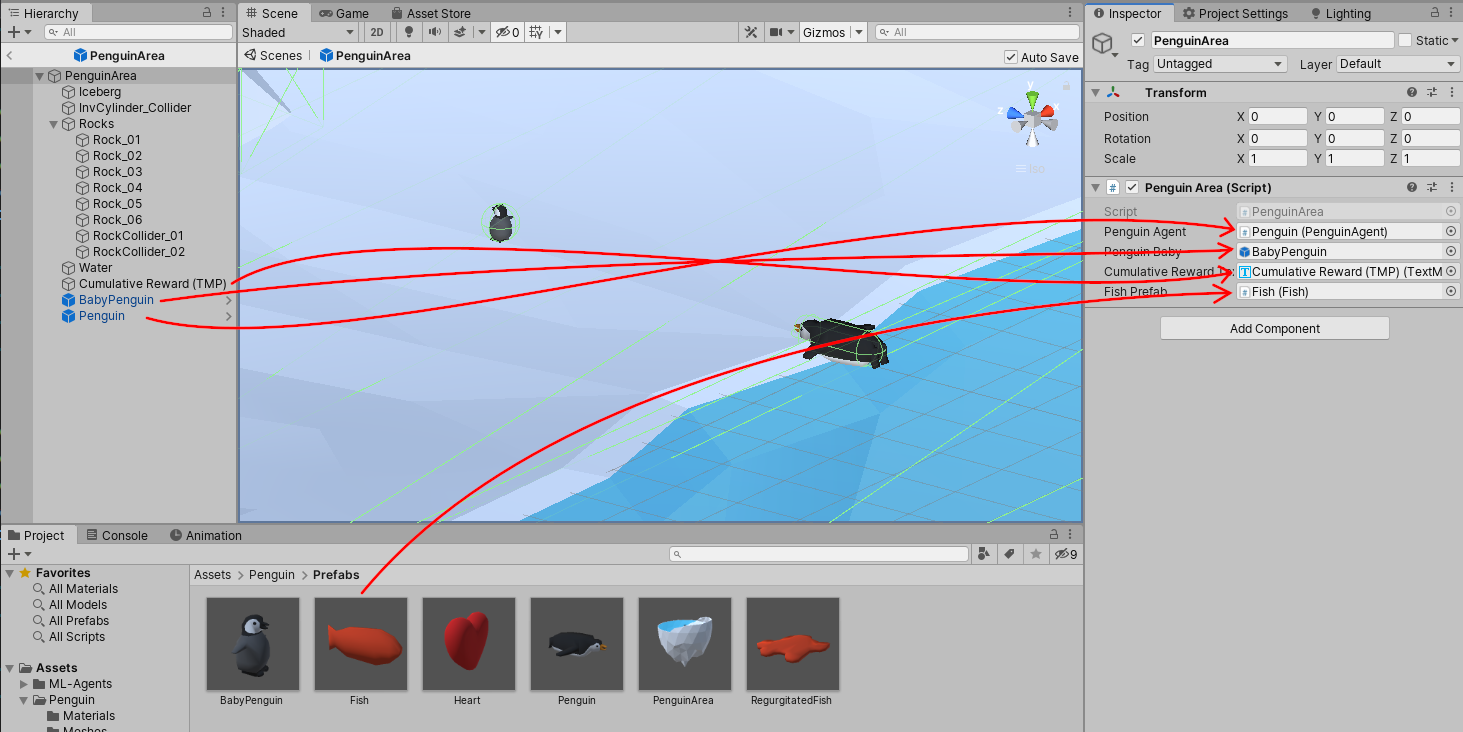
- Add a PenguinArea script component to the PenguinArea.
- Drag the Penguin from the Hierarchy to the Penguin Agent field in the PenguinArea.
- Drag the BabyPenguin from the Hierarchy to the Penguin Baby field in the PenguinArea.
- Drag the Cumulative Reward (TMP) to the Cumulative Reward Text field in the PenguinArea.
- Drag the Fish Prefab from the Project tab to the Fish Prefab field in the PenguinArea.
Figure 17: Drag the four objects to their respective fields
- Exit the Prefab editor by clicking on the Back (<) data-preserve-html-node="true" arrow in the Hierarchy tab.
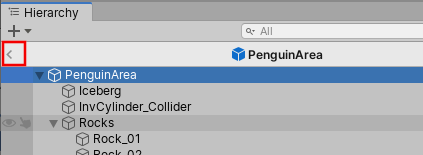
Figure 18: Click the arrow to exit the Prefab editor
- Expand the PenguinArea in the Scene view so that you can see its children objects.
- Select the Penguin in the PenguinArea.
- Change the Behavior Type (Figure 19) of the Behavior Parameters component to Heuristic Only (you will revert this change after you test it).
Figure 19: Changing the Behavior Type to Heuristic Only
This will not modify the Prefab, but it will allow you to test the Scene by playing as the penguin.
- Move the Main Camera so that it’s pointing at the area:
- Position: (-8, 9, -20)
- Rotation: (30, 22, 0)
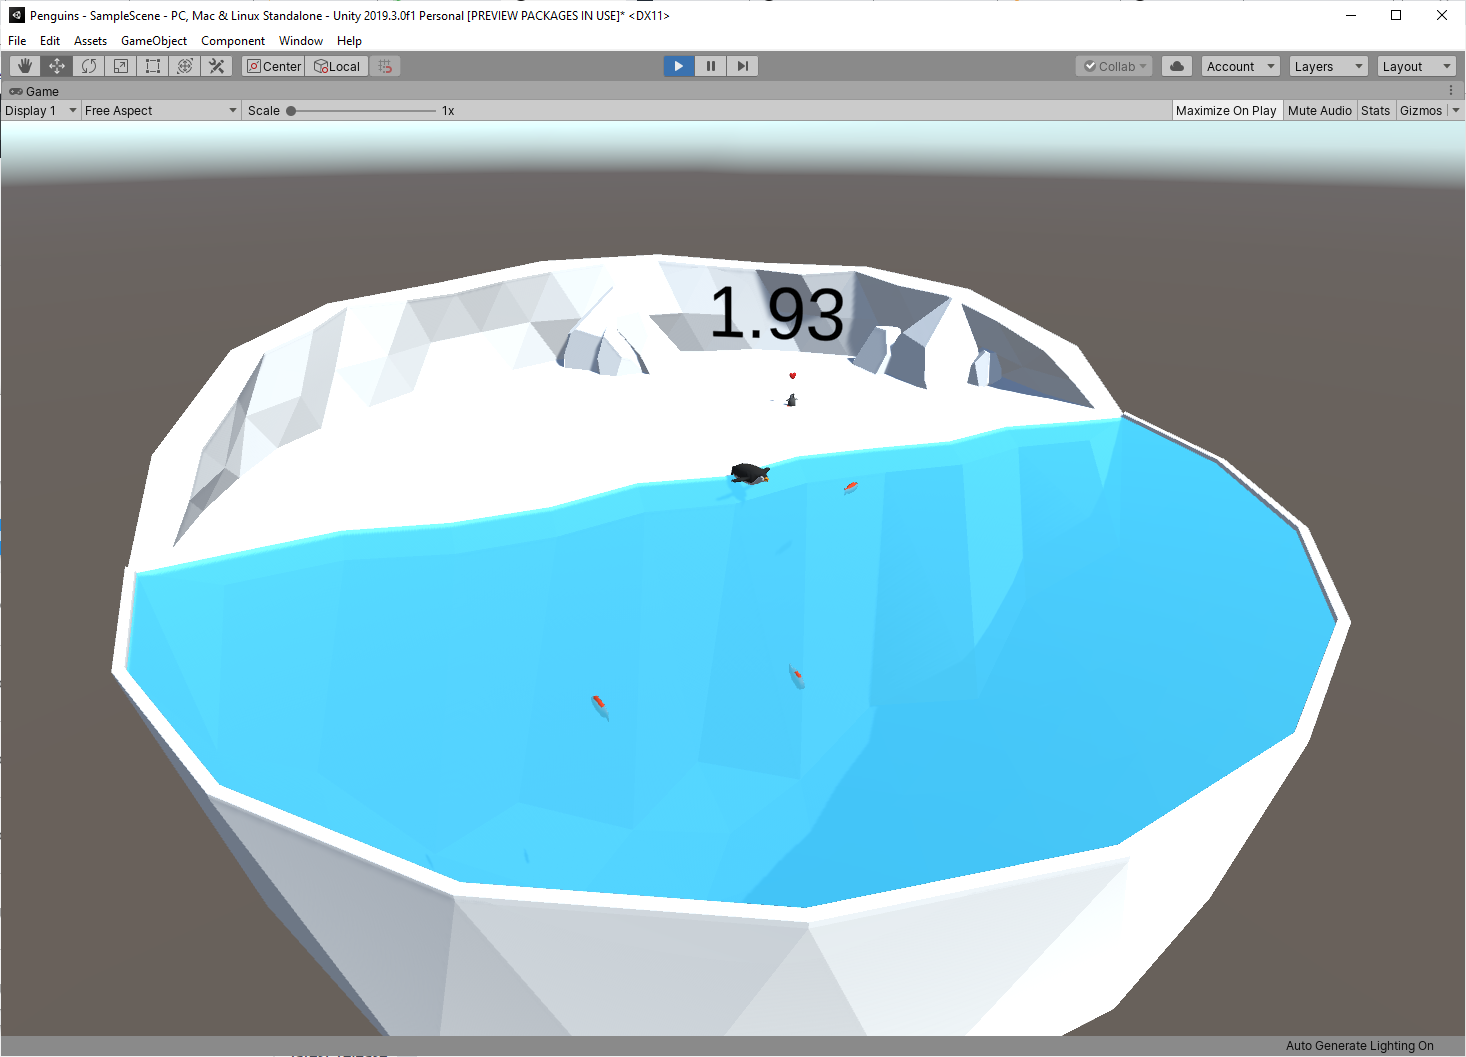
- Press the Play button at the top center of the Unity Editor.
Figure 20: Changing the Behavior Type to Heuristic Only
You should be able to control the movement of the penguin with the W, A, and D keys on your keyboard. Try to pick up fish and deliver them to the baby. Once you are within the six meter feed_radius, the penguin should feed the baby and the Cumulative Reward text should increase. When you deliver all four fish, the area and reward should reset.
- Change the Behavior Type back to Default after you’ve successfully tested the penguin.
Figure 21: Changing the Behavior Type back to Default
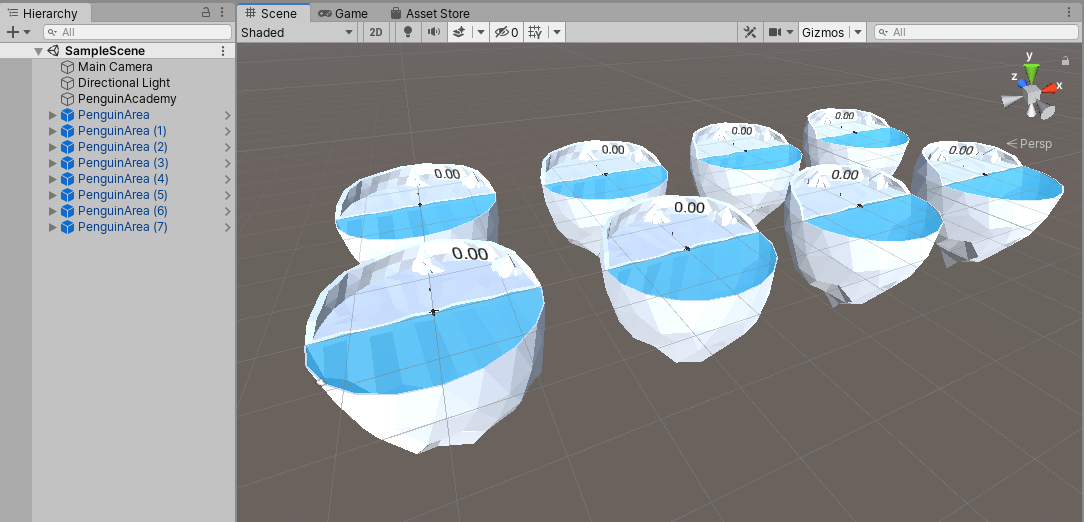
Before moving on to training, you should create several copies of the area so that several penguins can train simultaneously. This step is optional, but should help training go faster.
- Duplicate the PenguinArea seven times so that you have a total of eight areas.
- Space out the areas by about 40 meters in X and Z so that they do not overlap.
Figure 22: Eight instances of the completed PenguinArea, ready for training
Conclusion
You should now have Prefabs for the penguin agent, baby penguin, fish, and area as well as a Scene set up and ready for training.
Tutorial Parts
Reinforcement Learning Penguins (Part 1/4)
Reinforcement Learning Penguins (Part 2/4)
Reinforcement Learning Penguins (Part 3/4)
Reinforcement Learning Penguins (Part 4/4)

